The bits of this article which refer specifically to search engine optimization (SEO) techniques for Blogger blogs are highlighted with italics. You can look for those, you can read the entire article (recommended though unlikely), or you can click the links below to jump straight to...
During the few years since I started this blog I've seen a lot of visitors clicking the SEO label in my sidebar and a lot of people asking for SEO tips for their Blogger blogs. I don't claim to be a professional SEO but I have gathered some experience while working on this blog and on other sites as well. Because of all this, I feel the duty to explain my opinion on search engine optimization and present a few SEO techniques one can apply for Blogger blogs.
There seems to be a myth surrounding this topic and many blog or site owners seem to believe that search engine optimization is some sort of black art which turns plain metal into gold and any kind of web content into an instant hit. Many of us have thought this way about SEO at one point or another, in a certain degree. In this article I intend to contradict this myth, prove that SEO is part of a bigger picture and that there are other things one needs to focus on first. I would like to show that when it comes to creating a good website, things should be done in a certain order instead of randomly. Finally, by referencing the sources where I get my information from, I will demonstrate that there are plenty of good, clear and trustworthy ways of learning about SEO and website development.
Therefore, the general subject I'm going to talk about is "making a good blog or website" and I've broken it down into four categories. These can be seen as steps one needs to follow in order to create a good website and I've ordered them based on their importance - this is not the chronological order in which you'd build a site.
It's common sense that good, unique and compelling content should be the starting point for all websites. Sometimes we get frustrated that our articles don't appear in search results despite all the SEO we've done and we blame search engines for not being fair or we try to apply even more "SEO tricks" (or is it just me that does that?). In such cases I say we should instead take a look at our content and see if there's any room for improvement. Maybe we need to expand certain topics that are related to the general subject of our blog or site, maybe we need to think more outside the box and present our stories or products in an original way and maybe there's more content we can add to answer the needs and questions of our visitors. If any of these are true for the content of your site or Blogger blog, they should be treated with priority.
When making a website, the most important goal should be to add value to a community. So whether you have a product or a service you'd like to advertise or you simply want to tell your story or opinion, think about how you can make these as useful and original as possible. It's often a good idea to do some research and see what other sites have to say on the same subject or, in case of a new article for an existing blog, check out the statistics gathered by your favorite visitors tracking tool and find out your community's needs from that data.
Good content is next to nothing if it's difficult to reach or if it's packed with banners or ads which a visitor has to dodge in order to find the useful bits. A clear layout of your content and pleasant overall look of your site is very important. This shows that you've taken the time to create a website that looks nice, it shows you respect your visitors and thus it helps you gain their respect and trust in return. It's easy to see that a good website should have a good (folder) structure, clear navigation menus, index pages or HTML sitemaps, search boxes, perhaps a sidebar widget for recently visited pages etc. Ads should not take up a lot of space and even if you want to attract visitors' attention to them you should make sure they don't cause ad-blindness.
Format is also about making sure your content can be seen by a wide range of visitors. Think about the fact that some of your visitors may use various browsers (even outdated versions), with various settings. Some browsers may not support Java, Flash or JavaScript, others may be phone browsers that display HTML only and others may be set up for blind users or for people with other disabilities. Depending on the topic of your site or blog you'll probably want to address some of these issues and you should note that if you do your website will look more professional.
In order to solve most of the browser compatibility issues you should validate your pages using tools like the one offered by the World Wide Web Consortium (W3C) which is the main authority for developing WWW standards. You can also find guidelines on how to make your website accessible to people with disabilities on their site.
Another important aspect that needs to be mentioned in this section is the loading speed of your pages. There's a very useful section in Google Webmaster Tools which can help you with that. However, they also recommend installing the Page Speed add-on for Mozilla Firefox. It can be used to debug page loading issues and it is highly recommended you do so. This whole page speed area includes aspects regarding external resources like CSS or .js files and images loaded from different servers. So by taking care of the loading speed of your site you will also find the best ways to integrate such resources and maintain a balance between your HTML content and other technologies like JavaScript, AJAX or Flash.
For blogs hosted on BlogSpot most of the accessibility issues have either been taken care of for us or we don't have the means to change certain parameters that need improvement. For example, the label system and blog archive make it easy for visitors to find what they want, but there are many external resources (like CSS files) which increase the number of DNS lookups (decreasing loading speed). Non-the-less, there's improvement to be made for these blogs as well and the measures one can take vary from one blog to another – the best way to find out what you should do for your site is to use the tools I mentioned and see what they recommend.
So far, the format aspects I mentioned are all meant to help your human visitors and at this point the focus should be primarily on them. Later, you'll notice that some of these measures have an effect for search engine bots as well, but I'll talk more about that in the next sections of this article.
This step of the site building process involves a bit of luck. However, if you've taken care of the first two steps properly and you're committed to keep up the good work, you're ready to make your own luck and succeed in this area as well.
As you can tell from the title of this section, what you need to do at this point is get yourself and your site noticed on the web. The aim is to convince other site owners to link to your blog or website. There are several approaches you can use to increase your chances of achieving that. I'm going to mention only four of them: advertising campaigns, link exchange, directory submissions and comments or contributions on blogs or forums.
The first two are quite straight forward and self-explanatory. Ad campaigns are especially useful for business sites and for those who are looking for quick results. Link exchange is risky and should be done with caution. Personally, I'm not a big fan of the third option and I've always felt we offer more to blog directories (for example) than they offer in return. As long as it's a popular directory however, like Technorati for example, I suppose one could find it useful to submit his/her blog there.
The fourth option is by far the best one and it's also the hardest. It implies getting involved in on-line communities that discuss issues related to your site's topic. I'm talking about forums and blogs that are already popular, existing groups on social media sites or even groups you can start yourself on such sites. Among the numerous examples, I'd like to mention Answers.com, Yahoo! Answers, FaceBook groups or LinkedIn. As long and you make good contributions on such sites, slowly but surely you will start building a reputation and people will start giving you those organic links. This approach is explained in an article from the official Google Webmaster Central Blog and you should have a look through it in order to see more suggestions.
There's a related topic here on how to share your site's content on these social media communities and it involves special Meta tags you can add in order to control the aspect of your content on these sites. If you've read my Meta Description articles and got the hang of the methods used there, you could try to adapt them for these FaceBook share Meta tags. I'm planning on making another automatic code generator to include such tags as well, but I'm still experimenting for now and trying out different things.
Again, the things I've presented in this section are things you do for your human visitors. You don't need to worry about whether or not certain on-line communities add a "rel=nofollow" attribute to your links or whether their content is crawlable. As long as these are popular communities and as long as people get to see your contributions, this effort is worthwhile.
Now that your website has compelling content and clear format and search engines are crawling in from the organic links you earned, it's time to make sure the site is crawlable, search engine friendly and that search engines will index as much of your useful content as possible. Since this is the most technical part of my post, I've used a few important articles as reference: Google Webmaster Guidelines, Google's Search Engine Optimization Starter Guide, Official Google Webmaster Central Blog, Yahoo! Search Help Topics and articles from a Romanian SEO forum. I chose the latter source because one of the moderators there used to work for the same company as I did a few years ago and he got really good results for our website. Therefore, I had to adapt this last source of information in order to fit my view on search engine optimization, I adapted Google's info to make it work for other search engines as well and I scaled everything down to make these SEO techniques compatible with Blogger blogs.
Before we start I'd like to say a few words about the mind frame one needs to be in when doing SEO. Search engines are here to help bloggers and webmasters deliver their content to their audience. We, in turn, should try to help them crawl our sites and make our pages as search engine friendly as possible. Therefore, SEO is a way of working hand in hand with these engines in order to provide the best possible experience for our visitors.
The first thing one should understand before starting to optimize his/her Blogger blog or any other type of site is the structure of a search result. One such search result is made up of a title, a short snippet describing the content of the page it points to and the URL of that page. When words in the title, snippet or URL match the words in a search phrase, they become bolded to indicate how relevant the result is for that specific query. These bolded words are known as keywords and because search engine algorithms depend so much on them it's only natural for us to start our SEO efforts with...
Look for sites that present similar topics to yours and study them. They are your competition and you need to find out how popular they are (page rank is a good indicator) and what keywords they targeted. Sometimes these sites use a keywords Meta tag in their source code and you can look at that in order to find out which keywords you should avoid (in case the competition is too strong) and which to go for.
Use a keyword suggestion tool in order to see what people are searching for. A couple examples of such tools are: Google's AdWords suggestion tool and Wordtracker's tool. Apart from the fact that they suggest various combinations of search phrases, they also show how often people search for these terms. We'll use the term "short tail" for search phrases made up of few words and "long tail" for longer phrases. Short tail keywords are searched more often and they could bring more traffic to your site because they cover a larger logical area, but it is also harder to SEO your website for them as there are many other sites targeting them at the same time (some may be much more popular) and the competition is tougher.
After doing the research described above you end up with a list of keywords which you should sort by difficulty – short tail keywords and keywords that are searched more frequently should go at the top of your list, while long tails go at the bottom. This Seopedia.ro article then recommends that you arrange the keywords into three tiers:
- Tier 1 – high difficulty
- Tier 2 – medium difficulty
- Tier 3 – long tail search phrases for which it is more likely that your site will appear at the top of the search engine result pages (SERPs)
Let's go on and see where you can use these keywords...
Unless you want to use a generic domain name (like I use for this blog) you can get a head start by selecting a domain that contains two or three of your Tier 1 keywords. Don't use too many though, because it will look silly and there's a change of getting penalized. Many webmasters may use the actual URL of your site to link to it and if they do, you'll get those Tier 1 keywords in the anchor text of that inbound link – as we'll see later, this is very beneficial for your blog or website.
Once you've chosen your domain name, you should decide whether you want it to appear with or without the "www" prefix. You need to take measures in order to make sure that both these versions point to the same site. Not doing so will cause page rank dilution. The measures you can take are:
- configuring the .htaccess file on your server to redirect one version of the domain
- choosing the appropriate settings from a domain manager interface offered by the company from which you bought the domain – in case you don't have access to the server on which your site or blog is hosted
- choosing an option from Google's Webmaster Tools
For blogs hosted by Blogger, it's important to decide whether you want to stick with the subdomain they offer for free (example.blogspot.com) or publicize on your own custom domain. The latter option shows more authority and it's better from a SEO point of view. You can find a lot of resources on how to switch to a custom domain and a few extra tips in the article I wrote when I switched to agawebs.com. Note that when you do this switch your Blogger blog loses its page rank for a while even if you use 301 redirects and it takes some time before you regain it.
Lately, Google has been placing special emphasis on geo targeting. The name of the domain you choose has a high impact on how they determine where in the world is your target audience. For example, domains that end in .fr, or .ro are used to inform search engines that your audience is in France or Romania and they don't work so well if you also want to reach other countries. If you have a world-wide audience the best option is to choose a .com domain.
Search engines can generally find your keywords both in dynamic and static URLs. As far as dynamic URLs are concerned, it's recommended not to use session IDs or any other sort of randomly generated numbers in their structure and use as few name–value pairs as possible.
If possible, I think the best option is to avoid dynamic URLs altogether and stick with static, sharable URLs – i.e. if you send such a URL to friends via email, they will see the exact same content you saw. The structure of a static URL is closely connected to the folder structure of your site. Because of this, it is recommended you keep pages with a certain common topic in the same folder and name it using one of your Tier 1 or Tier 2 keywords. The names of the pages themselves should be assigned other Tier 1, Tier 2 or Tier 3 keywords.
For any given page or folder name, you should separate your keywords using hyphens ( - ) instead of underscore ( _ ) or any other symbol. Use only lowercase letters. URLs should not be very long and if possible, they should be easy to memorize by a human. In conclusion, a good URL looks like the example below:
- http://www.t1kwd-t1kwd.com/t2kwd/t2kwd-t3kwd-t3kwd.htm - where t1kwd is a Tier 1 keyword and so on.
Don't worry if you're not getting this right now. There's an example is section 4.8 which will explain things more clearly.
For Blogger blogs, post pages have static URLs and they are formed automatically based on the title of your post. In order to use certain keywords in this URL and not use them in the title of your article you can do this: initially you publish your post using a title made up of the keywords you want and then you edit the post and change the title to something more natural – the post page will keep that initial permalink.
There are also certain dynamic URLs on a Blogger blog, like:
- http://www.agawebs.com/search?updated-max=2009-02-12T22%3A13%3A00%2B02%3A00&max-results=5
"max-results=5" is a name–value pair like I mentioned above. Not only are these links hard to remember and don't make much sense to a human, but as we'll see later, the corresponding Blogger pages contain duplicate content and we'll have to take measures to keep them from being indexed.
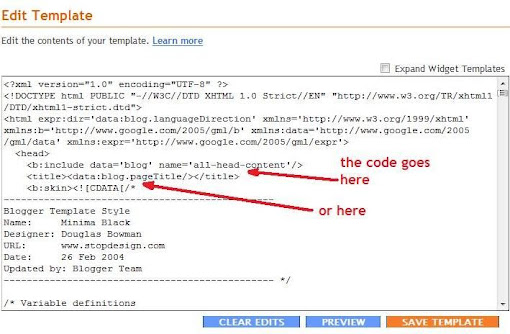
Page titles are declared in the <head> section of any given page and they're encased in <title> tags. These page titles appear on SERPs (search engine result pages) on the first line of a search result entry (as I mentioned in the description of a search result made earlier). Because of this, they are important SEO elements and you should use keywords from your list when writing these titles.
However, page titles should also be descriptive and look natural to humans. As a way of telling whether a page title is good or not, think whether you yourself would click such a link if you saw it on a SERP.
Write unique and accurate titles for each page. For Blogger blogs it is indicated to use the hack for swapping article titles with the blog title. Furthermore, you can use variations from that hack in order fine tune titles even more.
Most often a page's Meta description is used by search engines to create the short snippet that is part of a search result. Thus, it also appears on SERPs and like the page title it is an important SEO element. On a site or blog, this description is declared within the <head> section of each page, in a Meta tag.
Meta descriptions contain more words than a page title and should be used to briefly summarize the content of the respective page. Use keywords from all three Tiers for these descriptions, make them unique for each page and use different words than the ones in the actual content of your page.
For Blogger blogs, the Meta description hack provides the best solution I know of. I've seen attempts to automatically create Meta descriptions using article titles or even entire paragraphs from the articles. You're better off without any Meta descriptions at all than to use such an approach.
This is a Meta tag that's similar to the one for Meta descriptions. The only difference is that its content holds raw keywords separated by commas. However, as a visitor recently pointed out, this Meta tag is not used by Google in web ranking. Furthermore, as I explained in section 4.1, it can be used by other webmasters to discover your site's weak spots and outrank yours in SERPs.
Personally, I still use this tag for some of the articles on this blog because engines like Yahoo! still take it into account. Again, the only way to create unique keyword tags for each of your Blogger pages is by using the Meta description hack.
There's a large number of other Meta tags which can be used in the head section of your site or blog. Examples include:
- special Meta tags for certain platforms' API
- author
- date
- copyright
- expires
- refresh
- revisit after
While some of them should be used only for very specific purposes, others are optional or irrelevant and others (like the last three on my list) are NOT recommended. For reference you can use articles like: Meta tags - Webmaster Tools Help or Meta Tags Explained.
There's one more important Meta tag I'm leaving out for now and I'm referring to the Meta Robots tag. This can be used to prevent duplicate content or pages that are not useful from being indexed and I'll talk more about it in section 4.11.1.
A regular site should be tailored based on the 3-Tier hierarchy described in section 4.1. You should use the homepage and a few other important pages to target Tier 1 search phrases, by placing these keywords in the respective URLs, page titles, Meta descriptions as well as inside the content.
Less important articles on your site should be used for targeting Tier 2 search phrases, also by placing keywords as described above. Try to create Tier 2 pages that are each optimized for a single Tier 2 search term – because these search phrases have a medium difficulty and medium number of searches, there's a good chance that you will attract most of your visitors with them. On top of that, you should link these less important pages from the more important ones and use Tier 2 keywords in the anchor text of the respective links. If possible, use the rest of your pages and articles to target Tier 3 keywords and link them from Tier 2 pages.
To make this more clear, I'll use a quick and very basic example: a dog health website. Here is the (very brief) list of keywords I picked for this topic (as described in section 4.1):
| Keyword | Tier | Global Monthly Searches | Competition |
|---|
| dogs health | T1 | 74,000 | High |
| dog kidney failure | T2 | 8,100 | High |
| dog anemia | 3,600 | Medium-High |
| dogs diagnosis | 2,900 | Medium |
| dog anemia treatment | T3 | 170 | Low |
| dog anemia symptoms | 140 | Low |
| dog anemia causes | 73 | Low |
After deciding on these keywords, I'll choose the domain name for my website making sure I use Tier 1 keywords in it - I'll go for "dogshealth.com". The page name of my homepage is going to be "index.htm" and it's going to be placed in the root folder of my website. When my web server receives a HTTP request for the root folder, it will automatically send this "index.htm" page (this is done by default). Therefore, the URL of my homepage will be http://dogshealth.com/ and it will only contain those two Tier 1 keywords. The page title, Meta description and page content of this homepage will also be optimized for Tier 1 keywords.
Following the guidelines in section 4.3, I'll then create three folders within the root folder and name them using Tier 2 keywords: "dog-kidney-failure", "dog-anemia" and "diagnosis". In each of them there's going to be an "index.htm" page with title, Meta description and content that target the respective Tier 2 keywords. As for the root folder, these "index.htm" pages are going to be served automatically when a visitor requests to see the contents of the level 2 folders. I will also place links on my homepage, pointing to these Tier 2 pages. The anchor text of the links from the homepage will contain Tier 2 keywords that correspond to each page.
To target Tier 3 keywords as well, I'll create three new pages in the "dog-anemia" folder (for example). These pages will be named using Tier 3 keywords as described in section 4.3. I'll place links in the Tier 2 article from http://dogshealth.com/dog-anemia/ pointing to these three subpages and I'll use the respective Tier 3 keywords in the anchor text of those links.
In the end, the folder structure and URLs of my website will look as follows:
| Page URL | Targets keywords from... |
|---|
| http://dogshealth.com/ | Tier 1 |
| http://dogshealth.com/dog-kidney-failure/ | Tier 2 |
| http://dogshealth.com/diagnosis/ |
| http://dogshealth.com/dog-anemia/ |
| http://dogshealth.com/dog-anemia/causes.htm | Tier 3 |
| http://dogshealth.com/dog-anemia/symptoms.htm |
| http://dogshealth.com/dog-anemia/treatment.htm |
For Blogger blogs, most post pages are equally important from a site architecture point of view. To a certain extent, you can make a differentiation between post pages on BlogSpot by controlling the flow of internal link juice, but the general idea of using a 3-tire keywords hierarchy needs to be applied differently. For a blog, you may find it necessary to use keywords from all three Tiers on a single post page and to do that you should use the following suggestions on how and where to place keywords on a page.
Make use of headings and heading tags (<hN> - where N is a number from 1 to 6), and emphasize your keywords using bold, underline and italic text. Search engines use heading tags to understand the structure of your articles and they consider that bolded, underlined or italic text contains important elements of the article. For example, you could use Tier 1 keywords in the main heading of your article (<h1>) and optimize the introduction text for the same keywords. You can then write two or three subsections for that same article, use <h2> headings for each subsection and optimize both the headings and the subsections for Tier 2 keywords.
Certain SEO professionals also take into account the keyword density they get when writing an article. Some say up to 10% of an article should be made up of keywords. You can check the keyword density of your articles using automated tools like: Textalyser or LinkVendor's density checker. My personal opinion is that keywords should be used naturally within a text and one should not worry if this density level isn't reached, especially as long as the article is well written and descriptive.
Links have a central role in page ranking for many search engines and especially for Google. Google was founded (by Larry Page and Sergey Brin) on the idea that the relevance of a website is reflected by the relationships between sites, and these relationships are represented by links. This is why links have a special importance.
A link is made up of an anchor text encased in HTML anchor tags (<a>) and a "href" attribute that indicates which page the link points to. The most basic HTML code for a link looks like this:
- <a href="http://www.agawebs.com">anchor text</a>
There are three other important attributes you can use in the opening <a> tag of a link:
- title="short description": use this attribute to specify more information about the page it points to
- rel="nofollow": use this attribute for pages to which you do not want to transfer page rank. Here are some other values for the "rel" attribute. In section 4.11 we'll also look at how this attribute can be used to avoid duplicate content
- target="_blank": specifies that the linked page should be opened in a new window. Use it when you want to make sure visitors remain on your site. Other values for the "target" attribute can be found on this W3Schools page
Therefore, a more complex HTML code for a link that uses all these attributes would look like this:
- <a href="http://www.agawebs.com" title="short description" rel="nofollow" target="_blank">anchor text</a>
Link your pages to sites that are important and relevant to your topic. Use keywords within the anchor text and title attribute and make them short, descriptive and accurate. For example, a link that says "click here" has much less SEO value than one that says "article about Blogger Meta descriptions". The reason why you should do this when linking to other sites is because you will want to receive such high quality links yourself and thus, you should do the same for others. Secondly, search engines will consider that words in the anchor text of your links are important focal points of your article.
In case part of your site's content is generated by visitors' contributions and comments, you should automatically add the rel="nofollow" attribute to any links they may post. This discourages spammers and ensures you don't transfer page rank to any sites you cannot vouch for. For blogs hosted on BlogSpot, this is done automatically by the Blogger platform. Although it's not recommended, you can change this behavior for your blog by editing the HTML template.
These are links on your own site which point to other pages of the same site. As I was saying in section 4.8, they can be used to control the internal flow of link juice on a site. For example, if the homepage of your website has a high page rank and you link one of your Tier 2 articles from the homepage, this increases the importance of the Tier 2 article page. Use Tier 2 keywords in the anchor text of the link and in its title attribute.
You can also use links to create bookmarks within the same page. Let's say you have an article that's made up of three sections. You can bookmark the titles of each section and link those bookmarks at the beginning of the article so that a visitor can go straight to what interests him/her the most.
The code for bookmarking the titles would look like this:
- <h2><a name="section_1">Section 1 Title</a></h2>
- <h2><a name="section_2">Section 2 Title</a></h2>
- <h2><a name="section_3">Section 3 Title</a></h2>
and the links to these bookmarks would be:
- <a href="#section_1">Go to Section 1</a>
- <a href="#section_2">Go to Section 2</a>
- <a href="#section_3">Go to Section 3</a>
To link one of these sections from a different page, you would use something like:
- <a href="http://www.example.com/article.htm#section_3">Go to Section 3 of the Article</a>
As long as you use relevant keywords within the anchor text and "name" attribute of these links, they will be used by search engines to determine the structure of your article and the most relevant bits.
You get these when some other site links to yours. The more important that site is the more page rank yours will receive from that link. The inbound links you get by submitting your site to various directories don't have much SEO value and if Google detects that you're participating in dubious link exchange schemes, your site may get penalized. The best ways to maximize your chances of getting inbound links are those presented in section 3.
In case you notice that other sites have linked to yours, but the anchor text they used is incorrect or the links are broken, Google encourages you to contact the webmasters to whom those sites belong and ask for the links to be repaired. This way, you get some quality inbound links and the Google bot doesn't waste time trying to crawl broken links.
Google has an image search module from which you can get a lot of traffic simply by making good use of images. Use good quality, high resolution images and make sure you offer as much information about them as possible. You can do that by:
- assigning relevant and descriptive filenames to your pictures
- writing a short description in an images "alt" attribute: as long as it's brief, this description might be used by Google's image search module on SERPs
- specifying images' width and height within your CSS style sheet or within the "img" tag itself: in case the image cannot be loaded, this ensures your page is displayed correctly and the flow of your page elements remains the same
- placing images within contexts that are relevant to the respective pictures: the paragraphs (<p>), headings (<hN>) and captions that surround an image are all taken into consideration by Google's image search algorithms, so make sure you use keywords for these elements
A good example of how to embed an image on your site is the one presented in Google's "image guidelines" help page:
- <img src="puppy.jpg" alt="Dalmatian puppy playing fetch" />
If you need to use images as link buttons (i.e. encase an image in <a> tags), the "alt" attribute is a must. However, you should keep the description within it short and avoid keyword stuffing.
For Blogger blogs, most of the images you post are actually hosted on Picasa. You can locate the corresponding photo album on Picasa and login to add captions to your images, specify where they were taken, edit the rights for reusing those photos and decide whether the albums should be private, unlisted or public. Also, the links that point to your photos contain a parameter which determines their size:
- https://blogger.googleusercontent.com/img/b/R29vZ2xl/AVvXsEgws5FgmOttM1AsuyuPUN2Z7VP-RNh2COKWvELAfwlptTQ2x-cDy-bD08i2zQPVF67S45tM_9LrbCCuxXEcCPLApJ9lSgFbrp0IyUiq5DkkqeyqRGu1C8ztdOJgJPF6jpfB0qhcsUd9q7IN/s144/01-mogosoaia-palace.JPG
You can change the value of this parameter from s144 (in this example) to s400, s800, s1600 etc. in order to get different size versions of your photos. Use this to control how they appear on your blog.
We've established in the first section of this article that your website has to have unique and original content. Assuming you've taken good care of that, you should know that there are ways in which the content of your site (unique as it may be) could appear in several places at the same time.
Your content could appear on other sites which don't belong to you if you've syndicated your articles or if your articles are copied without your consent. This is called content scraping and in such cases Google tries to identify and index only the original versions of those articles. For the syndication scenario you should ask your syndication partners to include links to the original versions of your articles, but other than that, there's not much else you can do to avoid this sort of duplicate content. You generally need to leave it up to Google to decide which is the original version of the site and which ranks higher and they assure us that their search algorithms can determine this quite accurately.
The sort of duplicate content you need to deal with yourself appears when multiple URLs on your site point to the same page or to pages that are very similar.
For blogs hosted on BlogSpot you get duplicate content on archive pages, label pages or for URLs that point to comments. Moreover, links to bookmarks on the same page (like those presented in section 4.9.2) create different versions for an URL and they all point to the same article. This is not a major cause for concern because Google doesn't penalize this kind of duplicate content. However, you do want search engines to discover and index the useful bits of your site and not waste time crawling the same content over and over. To guide search engine bots towards sections that are relevant, you can use several tools designed specifically for solving this issue...
Rel="nofollow" is a link attribute which I've presented in section 4.9. On a Blogger blog, I recommend you use it for links that point to your label and archive pages. It can also be used similarly for regular websites in links which point to pages with duplicate content.
You can also use the "nofollow" directive in a Robots Meta tag. This informs search engines not to follow any of the links on the respective page. This is not recommended for Blogger and instead you should use this Robots Meta tag with the "noindex" value.
In short, what you need to do for Blogger archive or label pages is:
- use the rel="nofollow" attribute for links that point to them and...
- use the following Meta tag in the header of these pages:
<meta name="robots" content="noindex" />
For example, I would place this tag for my SEO label page by adding the following code in the head section of my template:
<b:if cond='data:blog.url == "http://www.agawebs.com/search/label/SEO"'>
<meta name="robots" content="noindex" />
</b:if>
There's more fine-tuning to be done for this hack and I promise to address this in a future article.
I've noticed that people use the Robots Meta tag on their blog with the content="follow" attribute. This actually has no effect because search engines follow the links on those pages regardless of whether this tag is present or not.
The final thing I should add about these directives is that search engines interpret them a bit differently. Here is what each major search engine does with them.
This is a text file which you need to place in the root directory of your site. It does a similar job like the Robots Meta tag and rel=nofollow attribute by telling search engines what not to follow or index. I'm not going to talk about it too much here for two reasons:
- it's harder to use than the options described in section 4.11.1
- Blogger automatically generates a Robots.txt file for each blog (e.g. http://www.agawebs.com/robots.txt), but you don't have access to it and it cannot be edited
The restrictions imposed by the Robots.txt file on Blogger refer to archive pages and label pages. However, for my blog I still see links to these pages on SERPs and that is why I think it's necessary to take extra measures (like those presented in sections 4.11.1 and 4.11.3) in order to ensure they're excluded from search results.
The standards for this Robot Exclusion Protocol used in Robots.txt files have been created by consensus and there's no single authority which decides what the protocols should be. However, you can find more information on how to use this tool on Wikipedia and Robotstxt.org.
Although telling robots what not to follow or index is a great way of avoiding duplicate content, there are situations when this is not enough. I'll use a Blogger example to explain why.
The following links both point to the same article:
- http://www.agawebs.com/2009/02/custom-meta-and-title-tags-for-blogger.html
- http://www.agawebs.com/2009/02/custom-meta-and-title-tags-for-blogger.html?showComment=1273667910919#c3073950090101837411
The first one is the actual post page for that article and the second one points to a comment. Most sites which link to my article will probably use the first version of the link, but others may use the second one to indicate a comment they found specifically useful. Moreover, you could have a "Latest Comments" widget in your blogs sidebar (like I do) and all the links in it will look like the second one. For such situations it is recommended to declare a "canonical" version of the URL.
The canonical URL is the simplest version of a URL or the URL you want to show for a certain page. In my example, the canonical version is the first URL. To declare this canonical version I would use the following code in the head section of my Blogger template:
<b:if cond='data:blog.url == "http://www.agawebs.com/2009/02/custom-meta-and-title-tags-for-blogger.html"'>
<link href='http://www.agawebs.com/2009/02/custom-meta-and-title-tags-for-blogger.html' rel='canonical'/>
</b:if>
If you've already used my automatic code generator to create Meta descriptions for your pages, you will only need to add the <link href='...' rel='canonical'/> tag within the corresponding "if" statement.
As reference, please use this Google help article on canonicalization.
This pretty much ends my "Duplicate Content" presentation. The aspects I presented are the most relevant for blogs hosted on BlogSpot. The discussion could go on for other types of websites and if you are interested in more details I recommend the following articles:
An XML Sitemap is a file you place on your web server to inform search engines about the pages and structure of your site. It's basically a list of pages (and some other details) written in an eXtensible Markup Language (XML) following a certain protocol and syntax.
Because Sitemaps indicate which pages are valuable and crawlable, they represent a good way of fighting duplicate content, but I chose to present them in a different section because they can serve more general purposes.
The easiest way to generate a XML Sitemap for your website is by using an automatic tool. However, you still need to be able to understand the protocol in order to double check it and you need to validate the Sitemap before uploading it to your site. Google has extended the Sitemap protocol allowing webmasters to include more data about specific types of content. For Blogger blogs, the platform automatically generates a RSS feed (e.g. domain.com/feeds/posts/default) which can be used as a Sitemap – as a matter of fact, this is the only way you can submit a Sitemap for your blog since you don't have access to the server that's hosting it.
Once you get hold of a valid Sitemap you need to inform search engines about it. You can do this by specifying its location in your Robots.txt file (done by default for Blogger blogs) and by submitting its URL via search engines' webmaster tools.
Most search engines offer an interface for webmasters to submit their sites and Sitemaps and control the relationship between these sites and search engine crawlers:
Use these services to keep track of how search engines index your site. There are plenty of resources which explain how these webmaster tools should be used. Because of that, I'm only going to present a couple of sections in Google's Webmaster Tools which can be specifically used to identify duplicate content issues for Blogger blogs:
- look in the Diagnostics section > Crawl errors > Restricted by Robots.txt and make sure this list contains as many URLs to your archive and label pages
- check the Crawl stats page (from the same section) and see if the number of pages they crawl per day is close to the number of posts on your blog plus one (the homepage) – if this number is much higher it means they're going through your duplicate content
I know this huge list of recommendations might look intimidating. We haven't discussed any advanced techniques (and there's plenty more to talk about there), but you should keep in mind that all of this should be done gradually in time – don't start with everything at once and take your time to do it properly. To paint a clearer picture I would use three metaphors for these web development stages:
- The Pyramid – all four stages are levels of a pyramid with "Content" as its base and "SEO" as its tip. You need all four to build something long-lasting and beautiful.
- The Ring – good content must be presented in a quality format and this whole package needs to be brought to visitors' attention by link building and SEO. The circle is closed by the fact that unique content is at the same time one of the most important SEO elements, as search engines strive to offer original and valuable results to their users.
- The Chain – as for The Ring, the four web development stages are connected to each other to support your products, services and ideas. A chain is as strong as its weakest link and that is why all four elements must be done properly.
I'll end this article here wishing you all good luck. There's a quote I saw somewhere (can't remember exactly where) which I hope will inspire you in your efforts to create the perfect website: "It takes years of hard work to become an overnight success".